|
Product Features & Specifications
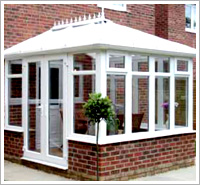
- Conservatories available in White, Rosewood on White, Rosewood and Light Oak
- Detailed installation instructions and plans supplied
- All Panels and Doors are factory pre-glazed (no need for de-glazing or glazing)
- Internally beaded 70mm new sculptured profile
- 28mm toughened safety glass to BS 6206A and sealed units to BS EN 1279
- Range of panel styles available and optional extras such as decorative glass designs and obscure privacy glass (transoms to all panels)
- Two top opening vents as standard with additional vents available
- Top opening vents have espagnolette locking with shootbolts
- French doors with two pairs of flag hinges plus intermediates and shootbolt locking
- 25mm polycarbonate available in Opal, Bronze, Clear or Bronze Opal (also 35mm option)
- Glass roofs available in market leading Celsius Performance Glass
- Roof vents available
- All Fixings, Sealants, Rainwater goods, Finials, Crestings and Flashing Tape are supplied
- A Classic Ogee Gutter is supplied with concealed brackets
- Roofing manufactured from structural Aluminium to BS 8118 and BS EN 755-2 and is supplied with PVCu cappings
- 10 year guarantee on all Conservatory models
|
Unique Installation Benefits
- Panels slide onto pre-routed Sill
- 1/4 turn Buttons lock Panels together
- No screws required
- No drilling required
- Pre-glazed panels (no de-glazing or glazing)
- Can dramatically reduce fitting time
|
 |
|
Connecting Panels to sil |
 |
 |
 |
|
|
Sills are pre-routed and cut to size |
|
Panels ready for assembly with factory Sill Support Blocks |
|
Panels engage into Sill and slide into position |
Connecting panels |
 |
|
 |
|
 |
Aluminium connectors slide down between the panels holding them together |
|
Rotating the ¼ turn button with an allen key secures the panels and ensures they are the correct distance apart. |
|
Once locked into position the buttons are used to locate the cover strip. |
|
|
|